

What if the best way to fit more into your storage unit is to leave a little room to move? Packing every corner can make one quick visit turn into a hunt through stacked boxes. These storage unit organization hacks help you make space for access as well as belongings, so you can find what you need without shifting an entire pile.
If you’ve ever forgotten what’s in a box or struggled to reach something at the back, a clear layout can help. Put frequently used belongings within easy reach, group similar items together and label boxes where you can see them.
This guide covers practical ways to plan zones, an access route and labels, then keep the system simple enough to maintain. You’ll also learn how to make good use of your unit without blocking access, and how to choose a size that suits what you plan to store. The aim is simple: use the space sensibly and make your next visit easier.
Key Takeaways
- Start with an inventory and note which belongings you’re most likely to need first.
- Use these storage unit organization hacks to plan a layout that makes room for access, not just more boxes.
- Choose containers and shelving based on what you need to see, stack and reach.
- Make each visit easier with a simple routine for checking your list and returning items to their places.
- Match your storage needs to a small, medium or large unit at SafeHouse Storage in Murray Bridge, Tenterfield, Lithgow or Coonabarabran.
Storage unit organisation hacks start with a plan, not a pile of boxes
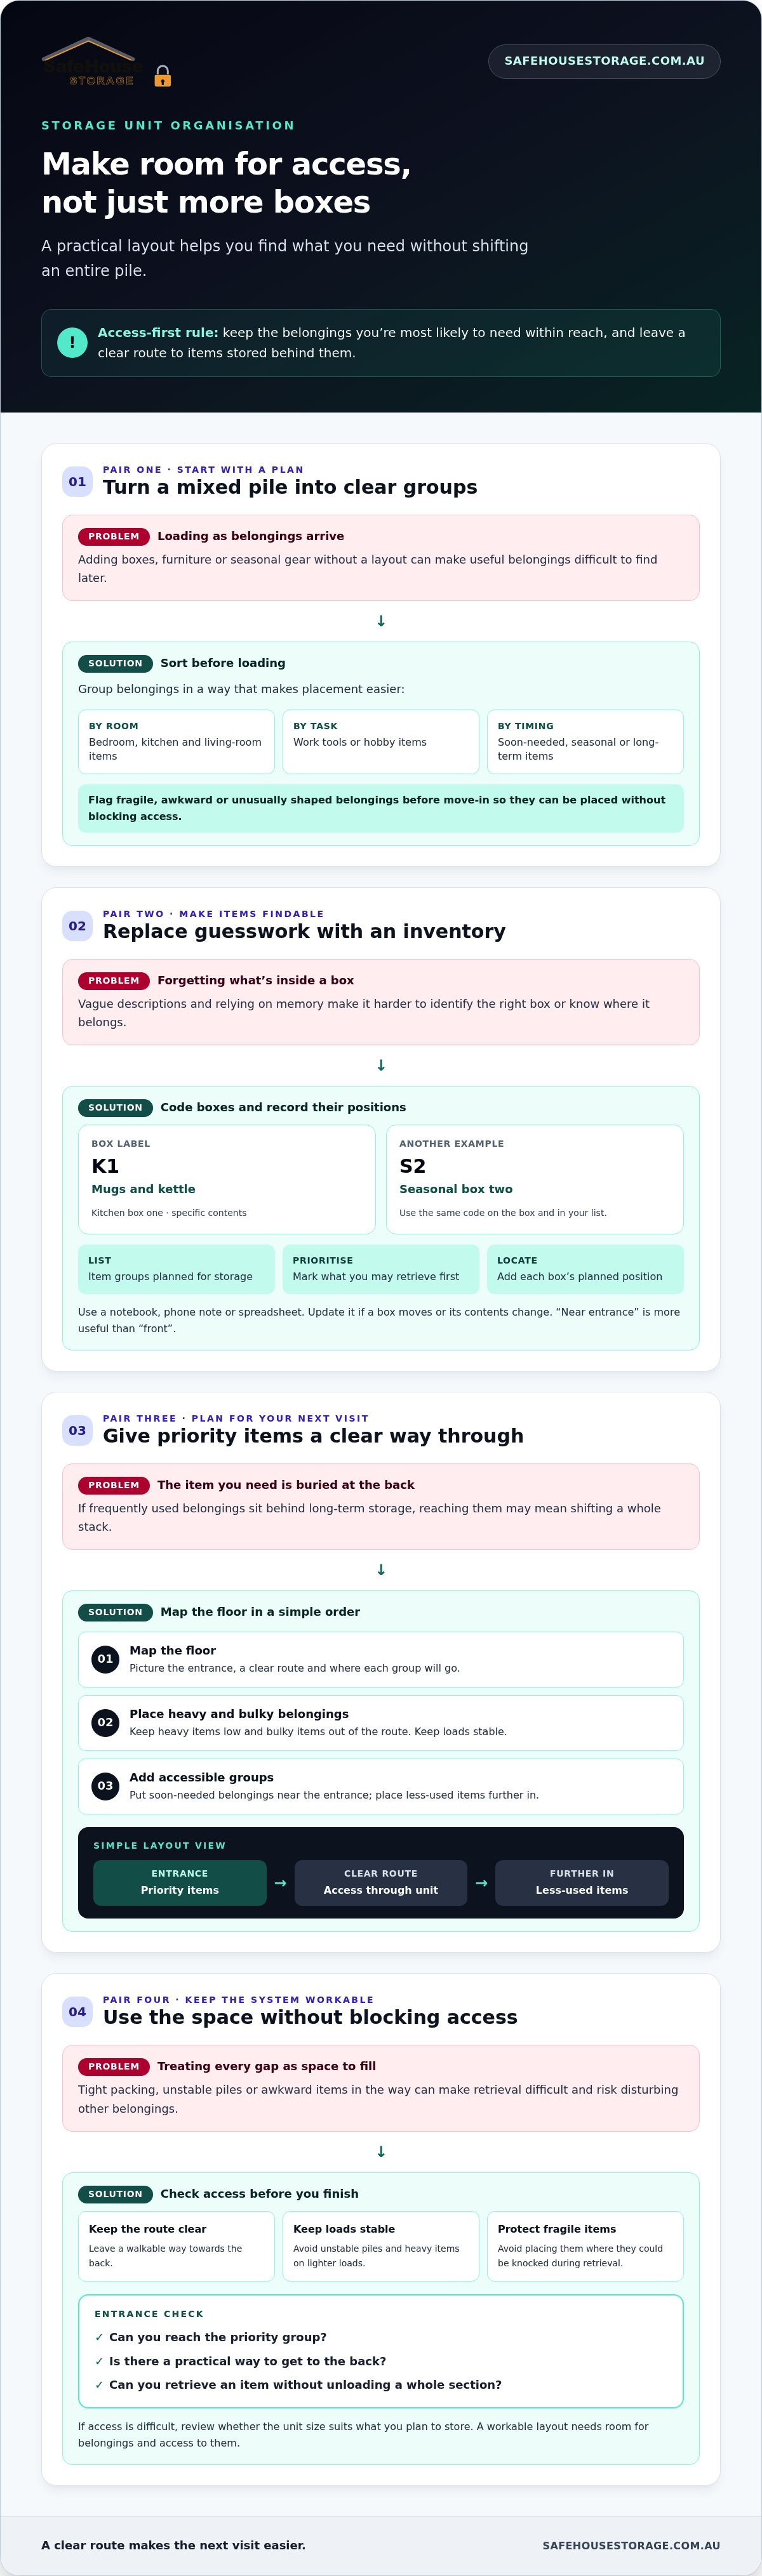
Belongings often arrive in batches. You might store a few boxes after a move, then add furniture or seasonal gear later. A layout made up as you go can quickly become difficult to use. The goal isn’t just to fit everything inside. It’s to find a particular item later without dismantling a stack.
Before loading, list what you plan to store and flag anything you may need soon. A general overview of a Storage unit can provide useful context, but your inventory should guide the layout. Start by identifying what’s coming in, what needs to stay accessible and what can go further back.
An access-first layout keeps the belongings you’re most likely to need within reach, while leaving a clear route to items stored behind them. This rule helps you make practical choices before boxes begin to pile up.
Sort belongings into clear groups before loading
Group belongings by room, purpose or when you expect to retrieve them. Keep kitchen boxes together, set aside work equipment you may need, and group seasonal decorations. Separate frequently used items from belongings intended for long-term storage. This makes it easier to decide where each group belongs and helps prevent useful items from getting buried.
- By room: group bedroom, kitchen and living-room belongings.
- By task: keep work tools or hobby items together.
- By timing: separate soon-needed items from seasonal or long-term belongings.
Flag fragile, awkward or unusually shaped items on your list. A lamp, mirror or long-handled tool won’t fit neatly into every space. Knowing what you’re storing before you load makes it easier to place these items without blocking access to the rest.
Make a simple storage inventory before move-in
Use a notebook, phone note or spreadsheet. Record each box’s contents in plain language, then give it a short code, such as K1 for kitchen box one or S2 for seasonal box two. Write the code on the box and in your list. Keep descriptions specific: “K1, mugs and kettle” is easier to scan than “kitchen bits”.
Add a location beside each code once you’ve planned the layout. “Near entrance” is more useful than “front”, especially if you return after a while. Note why the group belongs there too, such as “needed often” or “winter use”.
- List the item groups you plan to store.
- Mark the groups you’re most likely to retrieve first.
- Assign box codes and note their planned positions.
Keep the inventory easy to update. If a box moves or its contents change, edit the note straight away. A current list and clear groupings give you a practical starting point for loading and make it easier to find belongings on your next visit.
Plan your storage unit layout so everyday items stay reachable
A unit can look neatly packed on move-in day and still be frustrating to use later. If the camping gear you need next week is behind boxes of keepsakes, reaching it may mean shifting half the stack. Plan the floor before loading and follow a simple order to keep your route and priority items clear.
Arrange the unit for your next visit, not just for move-in day. This is what makes storage unit organization hacks useful in practice. Leave a walkable route towards the back and avoid packing so tightly that retrieving one item means unloading a whole section.
- Map the floor. Picture the entrance, a clear route through the unit and the areas where each group will go. Decide which belongings need to be reached first and which can sit further back.
- Place heavy and bulky items. Set heavier belongings low and position bulky items so they don’t narrow or block your route. Keep loads stable and leave enough room to reach items without pulling down a stack.
- Add accessible groups. Put belongings you expect to need soon near the entrance. Place less-used items further in, while keeping a route to the back of the unit.
Place heavy and bulky belongings with access in mind
Start with larger pieces, but don’t treat every gap as a place to squeeze in another item. A bulky chair or piece of furniture may take up floor space, yet its position can determine whether you can reach boxes behind it. Keep heavy belongings on the floor rather than balancing them on lighter, less stable loads. Leave enough room to handle stored items without first shifting an awkward stack.
Consider what could move when you pull something out. Avoid unstable piles, and don’t put fragile items where they could be knocked while you retrieve something else. Give awkwardly shaped items a place that won’t obstruct the route.
Keep priority items near the entrance
Identify anything you’re likely to need in the coming weeks. This might include work equipment, a household item or belongings for an upcoming change of season. Put these groups where you can reach them first, rather than behind things you won’t need for months. Use the priority notes in your inventory to guide placement instead of relying on memory while unloading.
Before you finish, stand at the entrance and check the layout. Can you reach the priority group? Is there a practical way to get to the back? If your belongings make those basics difficult, review whether a SafeHouse storage unit size suits what you plan to store. A workable layout needs room for both your belongings and access to them.
Choose shelves, containers and labels that suit your storage system
Containers and shelves can make a unit easier to use, but the right choice depends on what you’re storing and how often you’ll need it. Clear containers show contents at a glance. Sturdy boxes can be easier to stack when their sizes match. Open shelving can keep grouped belongings visible and accessible, provided it fits your layout and doesn’t block the route.
Use this comparison to choose a simple system that suits your needs. You don’t need to use one option for everything.
- Clear containers: Contents are easy to see, which can help when you’re looking for a particular item. Group similar belongings and stack containers only when they sit securely.
- Sturdy boxes: A practical choice for grouped belongings and regular stacking. Similar-sized boxes can create neater piles, but clear, consistent labels matter when you can’t see inside.
- Open shelving: Keeps items off the floor and within view, so it can suit belongings you retrieve often. Arrange items for easy access, and make sure the shelving doesn’t obstruct your route.
Mixing options can work well. Use one approach for items you need to identify quickly and another for belongings that can stay packed away. These storage unit organization hacks should make your system easier to use, not add extra steps.
Match containers to what you are storing
Where practical, choose containers with similar shapes and sizes. They’re often easier to stack neatly than a mix of bulky, uneven packages. Consider the contents too. Clear sides can help you identify items without opening each container, while sturdy boxes can suit belongings that are already grouped. Keep fragile or irregularly shaped items together and mark them clearly so they aren’t mistaken for ordinary stackable boxes.
Don’t force every belonging into a container. Long or oddly shaped items may be easier to place separately, as long as they’re secure and don’t block your route. Keep the arrangement simple enough to preserve access rather than adding containers just to make everything look uniform.
Create labels that work with your inventory
Make each label short and readable. Combine a category with a unique code, such as “Bedding B2” or “Kitchen K1”. Put the label on a side that stays visible when boxes are stacked, not only on top. Record the code and its general position in your inventory, such as “near entrance” or “left side”. Linking each label to a location helps you find a box without opening several or shifting a whole stack.
Use the same naming style throughout. If one label says “tools” and another says “garage gear” for similar belongings, your inventory can be harder to scan. Choose clear category names and stick with them. When contents change, update both the label and the inventory so they still match.
A useful system is one you can keep using. Choose containers that suit the belongings, label visible sides and make sure each code points to a clear place in your inventory.
Set up a storage organisation system you can maintain on every visit
A useful system shouldn’t depend on remembering where everything went. Keep the routine short and repeat it each time: check your inventory before you arrive, retrieve what you need, return items to their places and update the list if anything has changed. This stops small adjustments from turning into a confusing layout.
A one-page sketch can make the system easier to follow. Mark the entrance, the route through the unit and broad zones such as “left side: household” or “back: seasonal”. Add box codes where they’re stored. The sketch doesn’t need to be to scale. Its purpose is to show where each group belongs and help keep the access route clear.
- Check the inventory and sketch. Note the box codes and zones relevant to your visit.
- Retrieve what you need. Use the location notes rather than searching through unrelated groups.
- Restore the layout. Return items to their zones and update the list if a box moves or its contents change.
These storage unit organization hacks work best when your records stay current. A quick edit while you’re handling a box is easier than trying to remember what changed later.
Keep a location-based inventory current
For each stored group, record its box code, broad contents and unit zone. For example, “B2, bedding, back left” gives you a useful description and a place to start looking. If you remove an item or relocate a box, update the entry straight away. Keep the latest version on your phone or somewhere you can access before entering the unit, rather than relying on a note stored inside with your belongings.
Keep the sketch and list together, whether they’re in one phone note or on the same sheet of paper. If your layout changes, amend both. That way, the plan won’t point you to a place where a box no longer is.
Make the system work for regional moves
Moving between homes or towns can make labels and lists harder to follow, particularly if different people use different names for the same belongings. Use consistent category names in your notes, on boxes and in your moving plans. If you’re moving around Murray Bridge or Lithgow, mark time-sensitive groups clearly so essentials don’t get treated as long-term storage. For a move near Tenterfield or Coonabarabran, keep the layout plan with your moving notes so it’s easy to refer to when you access the unit.
A simple record can help you compare what you need to store with the space that will suit it. If you’re weighing up unit options in regional NSW or South Australia, explore SafeHouse Storage unit options and choose a size that supports a practical layout.
Find a SafeHouse storage unit that supports your organisation plan
A clear layout starts with choosing a unit that can hold your belongings and leave them practical to reach. Use your inventory as a guide. Consider how many items you have, their shapes and which ones you’ll need first. Boxes take up space differently from bulky furniture or long, awkward items, so assess the whole list rather than counting boxes alone.
SafeHouse Storage offers small, medium and large self-managed storage units. Choose a size that suits the belongings you plan to store and the layout you want to maintain. Account for access too: a unit packed wall to wall may leave little room to reach items behind the first row. If a smaller unit could suit your list, this small storage unit hire guide can help you think through what you intend to store.
Match the unit size to the belongings you have listed
Review your inventory and group items by size, shape and how often you’ll retrieve them. Keep essential or soon-needed belongings in mind as you estimate the space required. They’ll need to be reachable without shifting long-term storage out of the way. A simple floor sketch can help you picture how furniture, boxes and a clear route might fit together as you consider a size.
SafeHouse Storage has locations in Murray Bridge and Lithgow, as well as Tenterfield and Coonabarabran. Choosing a location near home can make sense if you expect to visit and manage the unit yourself. Facilities are unmanned, gated and camera-monitored. Consider these features alongside a layout that works for your belongings and how you plan to access them.
Arrange self-managed storage in your local area
Once you’ve settled on what you need to store, choose a local SafeHouse option that suits your needs and complete an agreement online. You can also arrange a unit through SafeHouse’s local real-estate partners if you’d prefer assistance through a local connection.
Self-managed storage gives you control over how you group, label and arrange your belongings. Keep your inventory and layout plan up to date as items come and go. With a suitable unit size and a simple system, your storage unit organization hacks can keep working well beyond move-in day.
Ready to compare local unit options? Explore SafeHouse Storage options and find a space that fits your belongings and organisation plan.
Make your next storage visit easier
A well-organised unit should save you time each time you return. Treat your first layout as a starting point, then adjust it as your needs change. If you find yourself moving the same belongings aside again and again, rethink their position. A small change to your zones or inventory can make the next visit smoother.
Keep the system realistic. Labels only help if they stay readable, and an inventory only helps if you update it. Choose storage unit organization hacks you can stick with rather than adding steps that make the unit harder to manage. The aim is a setup that works for your belongings and the way you use them.
When you’re ready to put your plan into action, explore the local options available through SafeHouse Storage. Explore SafeHouse Storage options and take the next step towards a storage space that feels manageable from the start.
Frequently Asked Questions
How do I organise a storage unit so I can find things easily?
Give each group a clear purpose and a place you can identify later. For example, keep items for setting up a new home separate from belongings you’re storing indefinitely. Before putting something away, ask: will I recognise this group from its label, and can I reach it without disturbing unrelated items? If either answer is no, adjust the grouping or position. These storage unit organization hacks work best when they suit the way you’ll use the unit.
Should I put shelves in a storage unit?
Shelves can help if you have smaller items that are awkward to stack or want to keep some belongings visible. Freestanding shelving may suit grouped household items, hobby gear or boxes you retrieve often. Choose a stable unit that fits the belongings and available floor space. Keep heavier items lower, and don’t let shelving narrow the route to other stored belongings. If most of your items are bulky, shelves may take up useful space without adding much benefit.
How do I label boxes for storage?
Use a short label that tells you both the category and contents, such as “Office, cables” or “Garden, hand tools”. Avoid labels like “miscellaneous”, which won’t help much when you’re searching later. If a box contains items for a particular move or project, add that purpose too. Write clearly and make sure the wording will still make sense months later. Keep personal details off labels that are visible from outside the unit.
Can I stack boxes in a storage unit?
You can stack boxes if the pile is stable and the boxes can bear the weight above them. Put heavier boxes at the bottom and lighter ones higher up. Keep the stack level, and avoid placing fragile belongings beneath heavy loads. Don’t stack so high that you can’t safely reach or remove a box. If you’re unsure whether a box will hold its shape, store it lower or keep it separate.
What should I put at the front of a storage unit?
Put belongings you expect to collect soon near the entrance, such as items needed for an upcoming move, work task or change of season. Keep a clear way to reach them rather than using the entrance for overflow. If several people may access the unit, agree on which group belongs at the front and mark it clearly. This avoids uncertainty when someone else needs to collect an item.
How can I keep track of what is in my storage unit?
Keep one master list and make it easy to search. A phone note or spreadsheet can include a box code, a few key contents and a broad location. Add useful search words, such as “school”, “linen” or “tax records”, rather than relying on a general category alone. You can also take a photo of the unit after arranging it, then replace the photo whenever the layout changes.
How do I organise storage during a move between regional towns?
Use the same category names on your moving list, box labels and storage inventory, even if the move happens in stages. Mark items that need to go straight to the new home separately from belongings staying in storage. For moves involving Murray Bridge, Tenterfield, Lithgow or Coonabarabran, keep a copy of the plan with your move notes so it’s easy to refer to between stops. Update it whenever the destination or contents change.


